
What happened here?


Thread Starter
Member
Joined: Mar 2006
Posts: 81
Hello. I just took my engine apart after a slow miserable death of my last engine. :/
I ended up with 2 blown side seals, and 2 blown corner seals on the inside of the front rotor. The side seals were blown on the trailing side of the side seal, and the last surviving side seal from that rotor is beveled on the trailing side also.

--Side seal A and B broke off on the TRAILING ends.
--The corner seals between A-B, and C-A, were cracked.
The rear rotors inside sides side seals are also beveled on the trailing side. When I say beveled, I mean they look like this.

The front side of the intermediate plate's ports look like this.
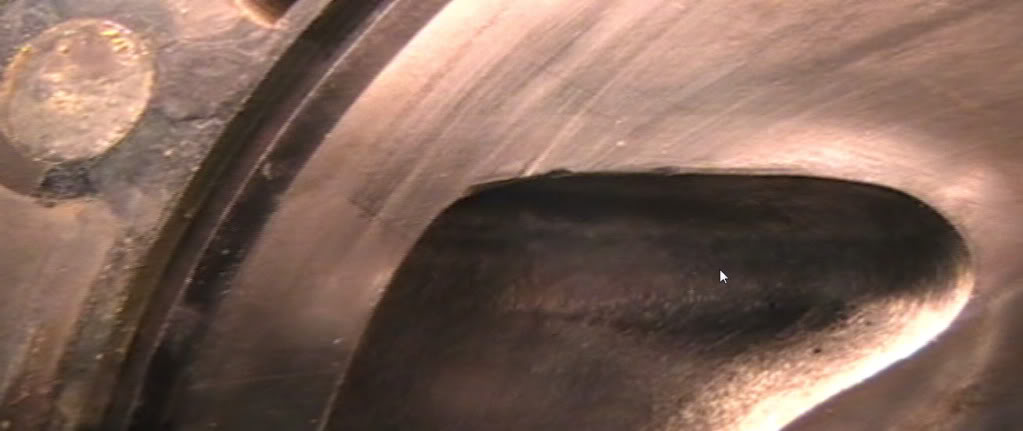
and the rear side of the intermediate plate's ports look like this.
What would you consider the main cause for this? The intermediate iron got a street port. These are from a 13b-RE. If you need any more information, just ask. Everything else in the engine was perfectly fine. (all apex seals, housings, turbo, turbo housings, were all perfectly fine.)
If I could get your opinion Lynn, that would be great.
Thanks
~Tweak
I ended up with 2 blown side seals, and 2 blown corner seals on the inside of the front rotor. The side seals were blown on the trailing side of the side seal, and the last surviving side seal from that rotor is beveled on the trailing side also.
--Side seal A and B broke off on the TRAILING ends.
--The corner seals between A-B, and C-A, were cracked.
The rear rotors inside sides side seals are also beveled on the trailing side. When I say beveled, I mean they look like this.
The front side of the intermediate plate's ports look like this.
and the rear side of the intermediate plate's ports look like this.
What would you consider the main cause for this? The intermediate iron got a street port. These are from a 13b-RE. If you need any more information, just ask.
If I could get your opinion Lynn, that would be great.
Thanks
~Tweak

Fabricator

Joined: Jan 2004
Posts: 1,322
From: Central Ohio (Hebron) Zephyrhills Fla.
Originally Posted by TweakGames' post='921710' date='May 15 2009, 10:04 PM
Hello. I just took my engine apart after a slow miserable death of my last engine. :/
I ended up with 2 blown side seals, and 2 blown corner seals on the inside of the front rotor. The side seals were blown on the trailing side of the side seal, and the last surviving side seal from that rotor is beveled on the trailing side also.
--Side seal A and B broke off on the TRAILING ends.
--The corner seals between A-B, and C-A, were cracked.
The rear rotors inside sides side seals are also beveled on the trailing side. When I say beveled, I mean they look like this.
The front side of the intermediate plate's ports look like this.

and the rear side of the intermediate plate's ports look like this.

What would you consider the main cause for this? The intermediate iron got a street port. These are from a 13b-RE. If you need any more information, just ask. Everything else in the engine was perfectly fine. (all apex seals, housings, turbo, turbo housings, were all perfectly fine.)
If I could get your opinion Lynn, that would be great.
Thanks
~Tweak
I ended up with 2 blown side seals, and 2 blown corner seals on the inside of the front rotor. The side seals were blown on the trailing side of the side seal, and the last surviving side seal from that rotor is beveled on the trailing side also.
--Side seal A and B broke off on the TRAILING ends.
--The corner seals between A-B, and C-A, were cracked.
The rear rotors inside sides side seals are also beveled on the trailing side. When I say beveled, I mean they look like this.
The front side of the intermediate plate's ports look like this.
and the rear side of the intermediate plate's ports look like this.
What would you consider the main cause for this? The intermediate iron got a street port. These are from a 13b-RE. If you need any more information, just ask.
If I could get your opinion Lynn, that would be great.
Thanks
~Tweak
Ito just did a bit on this (top of the open page).
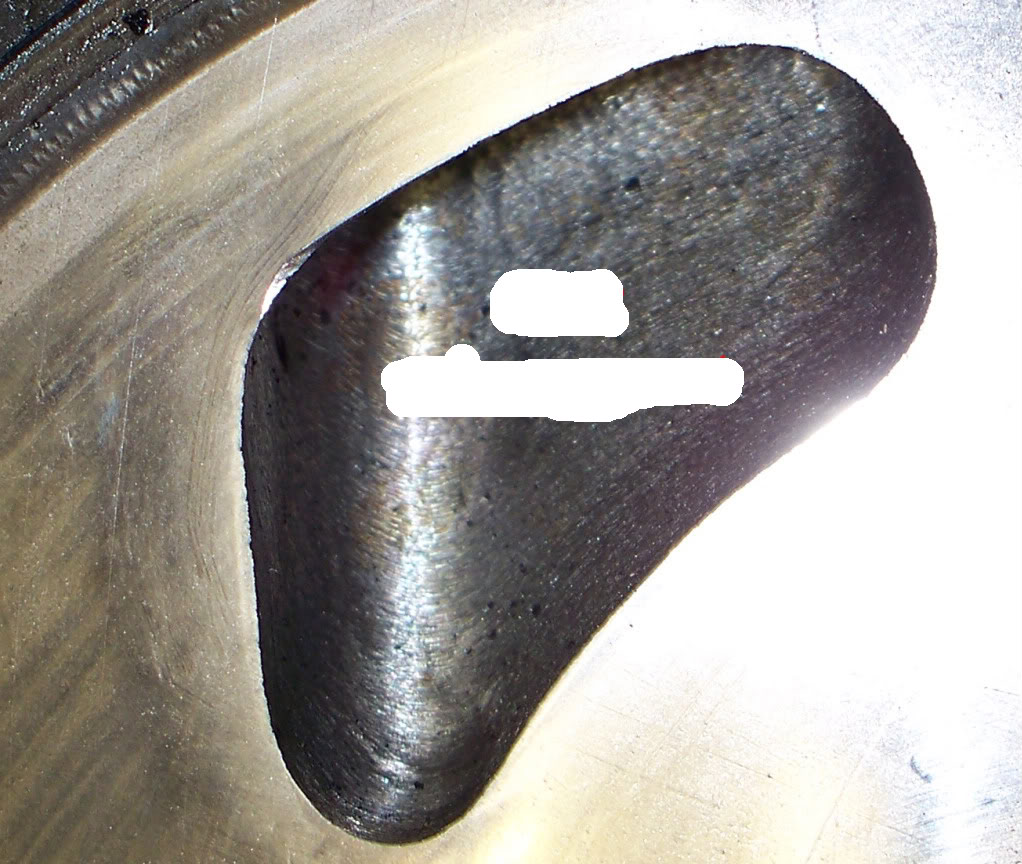
In the unmodified engine both ends of the side seals stay on the cast iron all of the time. The leading end runs closer to the outside of the engine (closer to the rotor housing) than the trailing end.
When you move the open line any at all, the trailing end of the seal will be unsupported when crossing the port. The open line runs alongside the housing wall.
So, when the seal is drooping a bit into the port, it runs into the sharp edge of the port at the closing line, (where those dents are located. The shock of this collision is transferred into the corner seal, snaping the corner seal at its weak spot (thinest).
All of this nastiness happens at cranking speed and just above as the engine starts up, and just as it is shut down. At other times the seals pass over the port so fast that there is no time for them to droop into the opening. It only affects the trailing end of the seal as the leading end follows a different path, and remains on the iron. Refer to the picture.
There is an easy fix for this. See Ito's picture and mine.
First: Move the open line outboard just a hair at the top where that dent is. So the end of the seal cannot touch the outer edge of the port along the open line. Notice that the closing line is just about the same shape as the rotor edge, and so the side seal shape. So the whole length of the drooping part hits the end of the port at the same time. Just the end gets filed away, as the inner part is lifted back onto the iron. So from inside to outside the seal comes back up onto the iron, like the blades of a scissors. The problem is that since the port wall and the seal are at the very same angle, you get the shock loading. So if scissors had blades that touched all along their length at once, they would not work well. So we make the port opening and seal act like scissors blades.
This done in the wedge shape outlined in the picture. This is not changing the closing line as far as port timing. Just a small amount is removed begining at the outer end of the closing line reduce the surface to the point that the groove or dent has reduced the iron and just a hair more. Then form a wedge shaped ramp all along the closing line that gets smaller in height and depth as it gets to the inner end of the closing line. So, near the open line you might reduce the edge of the closing line by .015" and then taper that off to zero on the inner end of the closing line. You are making a ski ramp to pick up the drooping end of the seal, and ease it back up onto the iron gently. Remember this only has to work at very low speeds.
Then polish this wedge shape. Break all of the edges around the port about .010" and polish like chrome. I will make another drawing of this and post it. I hope to have made this clear enough, but I need drawings to see anything.
The early solid corner seals are much stronger than the later versions with the rubber plug. Those were to get past the California polution tests for new cars, and they do seal up a bit better than the solids for a while. The rubber plug gets as hard as Chinese arithemitic, and some times breaks up into chunks that vanish.
Lynn E. Hanover
Fabricator
Joined: Jan 2004
Posts: 1,322
From: Central Ohio (Hebron) Zephyrhills Fla.
Adding this ramp does not change the port timing from the flow standpoint. If porting is yet to be done, then raising the outer edge of the closing line a bit higher, and leaving the inner edge a bit lower does the same thing that adding the ramp does, and just a mild radius and polish of the closing line is all that is needed. You must also keep the open line clear of the drooping side seal end, no matter what the closing line looks like.
OK, so in these pictures I have attempted to show the ramp and the relative position of the end of the side seal.
In every case, the closing line at the end of the ramp must be polished to a chrome like finish. All of the edges of the port should be radiused. Just break the edge with a fine round file, to produce a 45 degree face, about .010" (very small) and then round that with 400 wet or dry paper and oil. Then polish that rounded edge. You will never have a seal problem caused by this procedure.
On really huge ports and crazy stuff like a 6 port turned into a 4 port, consider leaving the very bottom of the open line close to stock to the extent that the trailing end of the side seal is on the iron for as long as possible, and drop it off of a step where the huge part of the port begins. Make a short ramp at that step as well so the engine can be turned backwards without snapping off the end of the seal.
Alternatively, since the port is going to be so big anyway, how about not moving the open line quite so far east that the trailing end falls off of the iron. Way fewer problems that way.
Also consider stepping up the idle speed a bit to cut down the time the seal has to drop into the port.
Lynn E. Hanover
Thread Starter
Member
Joined: Mar 2006
Posts: 81
WOW! Thank you very much for all the details and pictures. I WAS NOT expecting this much of a reply. You truly do deserve the title "Master of the rotary universe"! I will see what my porter (BDC) thinks about this idea. I have a feeling now that you have confirmed that the porting was what caused this he might have a change in heart. Maybe not though, I can't tell what he is thinking any more. I am not sure he will even be able to do a "ramp" like you have suggested. Do you offer a porting service or do you only do major race engines and such? I am very interested if you do.
Everything you just said seems so obvious now! I have no clue how some people go out and port their engines successfully themselves without knowing what is really going on. Maybe that is why a lot of people get blown engines and never really know why. If you were not looking for those marks on the plates and on the side seals I really doubt you would see them. Porting is much more complicated that I could ever have imagined, it really makes me want to go back to the stock ports just to avoid any further problems. If I need more power I can just raise the boost.
THANK YOU again for spending the time to clear that up in such great detail. Hopefully this will help stop a lot of blown engines in the future!
~Tweak

Senior Member
Joined: Dec 2001
Posts: 376
Originally Posted by Lynn E. Hanover' post='921712' date='May 16 2009, 08:18 AM
When you move the open line any at all, the trailing end of the seal will be unsupported when crossing the port. The open line runs alongside the housing wall.
Would that statement be true for ports ported to the shape of the RB street port templates?
Fabricator
Joined: Jan 2004
Posts: 1,322
From: Central Ohio (Hebron) Zephyrhills Fla.
Originally Posted by knonfs' post='921721' date='May 16 2009, 03:50 PM
Lynn,
Would that statement be true for ports ported to the shape of the RB street port templates?
Would that statement be true for ports ported to the shape of the RB street port templates?
I would suspect that in order to limit the number of unhappy customers, that their port is modest, and tracks the trailing end track on the iron exactly so as to eliminate any problems. I have never evaluated their mask or even seen a port done with it.
The term "street port" suggests that folks will not have the engine apart every few weeks just to see how things are going wear wise. So the port job ends up looking pretty stock. Probably a bit earlier open, later close, and a nice polish job, and thats about it. Later closing perks things up even just a little.
Typical closing is 50 degrees, Even 60 degrees would be a big help. 70 degrees would be a killer, with noticable loss of bottom end torque. My bridge ports close at 85 degrees, with no bottom end at all.
So there you are with just a guess.
Lynn E. Hanover

Member
Joined: Mar 2007
Posts: 44
Very interesting stuff! Thanks for taking the time to educate us! I laid out seal paths on an REW plate, and in stock trim (unported) the trailing edge of the seal does in fact run into the port. I think the only saving grace is the fact the the top of the port (closing edge) is angled in such a way to help tuck the seal back in before contact occurs.
Fabricator
Joined: Jan 2004
Posts: 1,322
From: Central Ohio (Hebron) Zephyrhills Fla.
Originally Posted by 13BT-RX3' post='921724' date='May 16 2009, 07:15 PM
Very interesting stuff! Thanks for taking the time to educate us! I laid out seal paths on an REW plate, and in stock trim (unported) the trailing edge of the seal does in fact run into the port. I think the only saving grace is the fact the the top of the port (closing edge) is angled in such a way to help tuck the seal back in before contact occurs.
Please ink up those irons and get us some pictures. I don't have any FD irons. Or, if somebody ships me some junk irons I can do that and post the pictures. I will scrap the irons after that.
In this picture I have cut open a rotor so I can scribe the leading and trailing seal end tracks.
Lynn E. Hanover
Member
Joined: Mar 2007
Posts: 44
Originally Posted by Lynn E. Hanover' post='921731' date='May 17 2009, 09:18 AM
Please ink up those irons and get us some pictures. I don't have any FD irons. Or, if somebody ships me some junk irons I can do that and post the pictures. I will scrap the irons after that.
In this picture I have cut open a rotor so I can scribe the leading and trailing seal end tracks.
Lynn E. Hanover
In this picture I have cut open a rotor so I can scribe the leading and trailing seal end tracks.
Lynn E. Hanover
Absolutely. It's not the greatest pic but you get the idea.

Here is a picture that you can see the closing edge of the port is angled in a way to help the side seal return into it's groove from the factory. Ignore the other iron

Fabricator
Joined: Jan 2004
Posts: 1,322
From: Central Ohio (Hebron) Zephyrhills Fla.
Originally Posted by 13BT-RX3' post='921732' date='May 17 2009, 09:13 AM
Absolutely. It's not the greatest pic but you get the idea.
Here is a picture that you can see the closing edge of the port is angled in a way to help the side seal return into it's groove from the factory. Ignore the other iron
Here is a picture that you can see the closing edge of the port is angled in a way to help the side seal return into it's groove from the factory. Ignore the other iron
You need an electronic camera set on Macro. I can see only one of the tracks. In any case I forgot the obvious again, a fate of old people.
Where the trailing end track falls into the port, you need a short dart cut with a 1/4 stone right along the track, the same as the closing line, but not as long, because the engine is seldom turned over backwards, except during building, or as an accident like rolling off of the trailer or similar.
So if you have an engine that you have not built or a stock late model engine that may not support the trailing end of the seal, just never turn it backwards. That would be a worse case than even turning in the correct direction, as more than 1/3 of the seal length will be unsupported and the end will run dead on into a sharp corner at the bottom of the port. But now you know the fix, and that will never happen to you.
So, if you need the engine's compression drag to help you slow the car coming off of the trailer, put it in reverse first. Attach the towing strap the the car, and the trailer, in the event that it pops out of reverse, and just shove gently and the car will walk off of the trailer with no drama. The engine will turn slowly and in the correct direction of rotation. Every year a runaway race car causes damage at a race track.
Allways ask for help, you will never be turned down.
Lynn E. Hanover

