Home entertainment systems
 12-25-2010, 02:40 PM
#31
Super Moderator


Join Date: Apr 2002
Location: VA
Posts: 2,532

 12-27-2010, 08:31 AM
#33
Super Moderator
Thread Starter

Join Date: Sep 2002
Location: Tallahassee, FL
Posts: 5,425
02-01-2011, 01:47 PM
#34
Senior Member

Join Date: Jan 2003
Location: London, Ontario
Posts: 2,871
I built my own stand, since I wanted to stack 4 components plus the center channel. This way I could make each shelf the right size for the component.
It's just nice birch plywood with matching veneer trim on the sides. Home Depot will cut it to size for you and you apply the veneer tape with a clothes iron. Sand, assemble and stain and you're done.
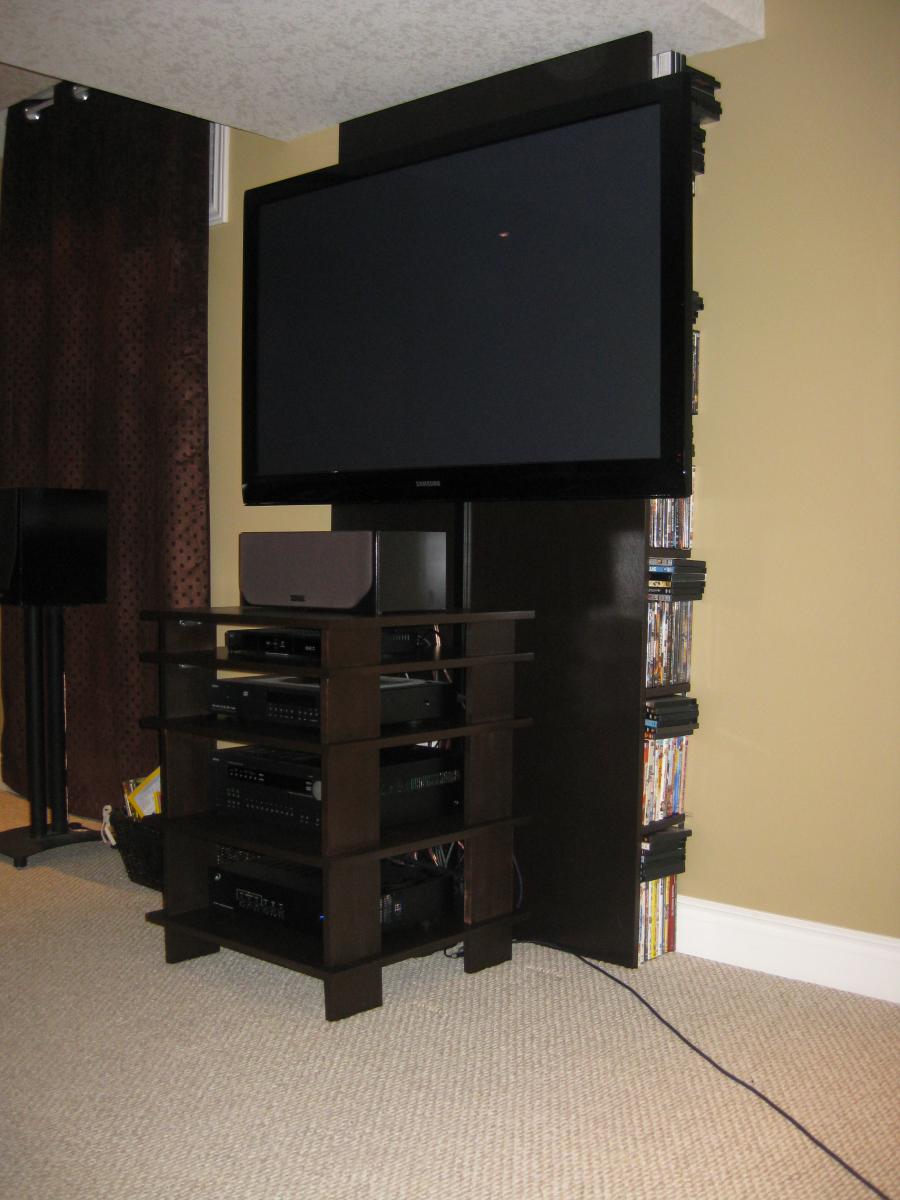
I ran the wires through the wall since it was accessible. The dark wall behind the tv is actually a sheet of the same plywood as the stand, since the wall had a step in it in that area this gave me a secure mounting point for the tv.
I also built 3 subwoofers and I'm designing matching speakers now to replace the Mission speakers in the photo.
This is why I have an RX-7 with no engine.
It's just nice birch plywood with matching veneer trim on the sides. Home Depot will cut it to size for you and you apply the veneer tape with a clothes iron. Sand, assemble and stain and you're done.
I ran the wires through the wall since it was accessible. The dark wall behind the tv is actually a sheet of the same plywood as the stand, since the wall had a step in it in that area this gave me a secure mounting point for the tv.
I also built 3 subwoofers and I'm designing matching speakers now to replace the Mission speakers in the photo.
This is why I have an RX-7 with no engine.
02-01-2011, 02:11 PM
#35
Senior Member
Join Date: Jan 2003
Location: London, Ontario
Posts: 2,871
I also built this one for a friend, if you're looking for ideas. Also built from the same plywood, this was harder to build since I couldn't build it in her living room I had to build it in 2 pieces in my garage, assemble the pieces in her garage then install. Build it in place if you make something this size. 

02-01-2011, 02:40 PM
#36
Super Moderator
Thread Starter
Join Date: Sep 2002
Location: Tallahassee, FL
Posts: 5,425
Nice! The first one is exactly what I want, something no bigger than necessary. Are all the vertical segments separate? Or did you slot each shelf so all the pieces slid in together?
02-01-2011, 03:13 PM
#37
Senior Member
Join Date: Jan 2003
Location: London, Ontario
Posts: 2,871
It's all screwed together with maple boards cut as legs. I was going to do metal legs but I bought the metal intending to borrow my buddy's lathe at his shop but never got around to it.
Solid sides with slots might not be a good idea if you're building the shelves tight around the components as you need some airflow in there. If you make it wide just do solid sides with strips of wood to rest the shelves on, slots are hard to do nicely unless you have a table saw or router.
I would screw it all together if I were you, since you have kids if you just stack shelves they can get knocked off. Leave a couple inches all around the receiver as it will make heat when playing music for long periods.
02-01-2011, 03:26 PM
#39
Senior Member
Join Date: Jan 2003
Location: London, Ontario
Posts: 2,871
Yes
Each shelf is 24" by 24" and 4 legs per shelf are cut to the height you need for that shelf.
In my case I had to cover some holes I pre drilled for the metal legs. I think it would also look good if you did a single 'leg' on each side that was 12" wide in the center of the shelf front to back. this would be easier.
04-25-2011, 10:22 AM
#40
Super Moderator
Thread Starter
Join Date: Sep 2002
Location: Tallahassee, FL
Posts: 5,425
I started working on this Friday night. I carefully pulled up the shoe molding and baseboard, luckily I haven't cracked any yet. The sheetrock goes all the way to the subfloor, but there's plenty of gap between the hardwood floor and the wall.
I cut a hole in the sheetrock below where a speaker would be mounted, which would be covered by the baseboard. I then cut a hole for the speaker jack/box/whatever, and ran a fish tape down to the first hole. Pulled the wire through, installed the 2-post jack, and stuff the wire in the gap at the floor. Installed the baseboard with the help of a few additional finishing nails, and it looks great.
I've got 3 speaker jacks and the center one they all run back to installed, I just need to finish the last one. It requires running wire molding around the trim of a sliding glass door, but other than that it's the same as the others.
So far, it's gone way better than I could have expected. I was trepidatious about removing baseboards (they tend to crack and split) and about cutting into sheetrock in the middle of my living room wall, but luckily it's all been going very well. Hopefully when I wire up the speakers the sound comes out...
I've been taking pics of the process, I'll put some up once complete.
The Xbox got moved downstairs to be connected to the old TV, along with all the Guitar Hero/Rock Band peripherals.
Additionally, I took my "tower" unit that was housing all of my components, and made it shorter so it could sit under the TV. You see them in a lot of people's houses, black wood with glass shelves and a drawer on the bottom (I think it's from walmart). I cut the legs off to be 3' tall with a skil saw, which was horrible, the cuts were all slanted and wonky. But I bought some of those screw-adjustable feet, to make it sit level. It worked great. Drill a hole in each leg, hammer in the "sleeve" thing, then screw in the slider feet. Now I've got all my components on a compact, good-looking unit that fits where I want it, and it only cost me a few bucks for the feet (would have been less if I could measure and cut better).
Unfortunately, the HDMI splitter I got from Monoprice sucks. I've only used it a bit, but I've already had to unplug/plug back in to reset it after it wouldn't switch inputs properly (flashing screen/static picture, etc.). I chatted with monoprice this morning, and have a few things to try when I get home.