Replica Re-amemiya Diffuser
 05-10-2004, 01:45 PM
#341
Senior Member

Join Date: Nov 2001
Location: Bayarea, CA
Posts: 1,009
There is no installation hardware for the diffuser. You use the stock mounting bolts. All you need will be two additional rivets.
Some installation instructions were mailed out separately last week.
As for receipt, if you paid by PayPal, print out the PayPal payment page and that's your receipt.
Chuck Huang
Some installation instructions were mailed out separately last week.
As for receipt, if you paid by PayPal, print out the PayPal payment page and that's your receipt.
Chuck Huang
 05-12-2004, 12:07 PM
#342
Junior Member

Join Date: Dec 2003
Posts: 11
Originally Posted by roadsterdoc' date='May 7 2004, 03:03 PM
Also, mine had several scrapes in the black finish showing white underneath. They are on visible areas so I don't think touching them up will look good. I guess I need to repain the whole thing. Chcuk- of the can spraypaints out there, do you recommend a particular brand that matches? Matte black is what I'l use unless you say otherwise.
At first I was thinking I should just leave it as it is, but it won't stay this nice very long. It's obvious it'll get scratched up very easily and look like ***, especially on a daily driven FD.
 05-12-2004, 08:45 PM
#344
Member

Join Date: Jan 2003
Posts: 93
I was just at Lowes, and bought a can of coating (in the paints section) made by the company that makes the dipping solution you put on the handles of pliers, tools, etc. Sort of rubberized. I haven't as yet sprayed it on, but it claims to be very durable. I'll shoot some over the weekend and report back.
05-21-2004, 02:03 AM
#346
Senior Member
Join Date: Nov 2001
Location: Bayarea, CA
Posts: 1,009
Sorry about the lag. Here is the installation instruction.
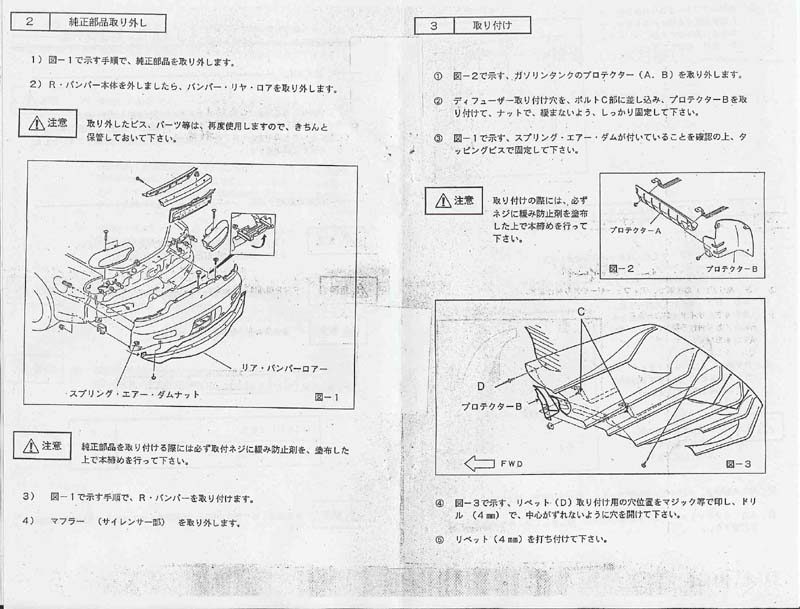
For the very back, you take off the stock under bumper lip and use the exisiting holes. There are marks on the diffuser but they are not drilled.
For point "D", you need to use a rivet on both sides.
For point "C", there are existing nuts on the car that you use to secure the diffuser. Again, you need to drill holes on the diffuser and there are marks on the diffuser.
I think the rest is pretty self-explanatory.
Chuck
 05-21-2004, 02:39 AM
#348
Senior Member
Join Date: Nov 2001
Location: Bayarea, CA
Posts: 1,009
Originally Posted by FikseRxSeven' date='May 20 2004, 11:32 PM
i cant imagine you have to take the bumper off to get this thing on right?
Chuck
05-21-2004, 08:56 AM
#349
Senior Member

Join Date: Jan 2003
Location: Huntsville, Alabama
Posts: 116
Originally Posted by rotaryextreme' date='May 21 2004, 01:03 AM
Sorry about the lag. Here is the installation instruction.
For the very back, you take off the stock under bumper lip and use the exisiting holes. There are marks on the diffuser but they are not drilled.
For point "D", you need to use a rivet on both sides.
For point "C", there are existing nuts on the car that you use to secure the diffuser. Again, you need to drill holes on the diffuser and there are marks on the diffuser.
I think the rest is pretty self-explanatory.
Chuck
05-21-2004, 01:49 PM
#350
Senior Member
Join Date: Nov 2001
Location: Bayarea, CA
Posts: 1,009
Originally Posted by HDP' date='May 21 2004, 05:56 AM
Ummm... what happened to the instructions that were already suppose to be in the mail along with my invoice?
Chuck Huang