Project Update
 06-27-2004, 05:19 PM
#161
Senior Member
Thread Starter

Join Date: Jul 2002
Location: Fayetteville, Georgia
Posts: 2,483
Originally Posted by Jeff20B' date='Jun 27 2004, 06:13 PM
I like that FC leading coil in the background. Are you gonna use it? Please use it instead of the stock FB ignition stuff (through the cap and rotor) that came with the '85. Direct fire even makes the engine sound better. 
Be sure to give Racing Beat a call tomorrow.
I think I found two of the six P plate bolts. They have an unthreaded section to align the P plate and go in two slightly smaller holes than the rest of the bolt holes. How do I know this? I've done like four clutch jobs on my 13Bs and one 20B recently.
I think I found two of the six P plate bolts. They have an unthreaded section to align the P plate and go in two slightly smaller holes than the rest of the bolt holes. How do I know this? I've done like four clutch jobs on my 13Bs and one 20B recently.
And yes I have two bolts, but I need more than that, am I right?
So are you saying I need "special" bolts for this?
 06-27-2004, 05:34 PM
#162
Senior Member

Join Date: Nov 2001
Posts: 2,284
As for the bolts, when installing 215mm clutch stuff, I could use stock P plate bolts. On my 20B, I installed '83-'92 225mm stuff that required special longer bolts and 10mm or so aluminum spacers from RB. This is due to the different P plate wear surface depth Mazda used on their larger diameter clutches. RB saved money by making their NA flywheels compatible with both sizes.
I've seen FD flywheels and know they are virtually flat, but I don't recall ever seeing a T2 flywheel up close. It looks like that ACT clutch is also virtually flat, so maybe special bolts from RB aren't required?
The reason why you need special bolts for the 225mm stuff is because the NA flywheels are compatible with two sizes of disks. Since T2 flywheels are 240mm and different in other ways, I don't know what to tell you.
One way to spot P plate bolts is to look at the thread pitch. It is very fine. You see, normal Mazda bolts in that size are 8mm x 1.25 (coarse) and are found all over the place such as intake to engine, rats nest to rotor housings, front cover to engine, fuel injector rails etc. Very common and always coarse thread. Oh, they also always are 12mm and have a raised 6 on the head.
The P plate bolts are 14mm on the head, have a 10 strength rating (or is it a 12?), and have a very fine thread pitch (sorry, I don't know it, but it's probably 1.0 or .7mm or something equally small).
You may already have all six bolts sitting there. Can you get any close ups of the bolts? I wonder if I can with my dad's new digital camera.
You might be able to install your clutch today, or atleast get everything ready for tomorrow. Do you have an alignment tool? I won't do a clutch job without one. I'd rather have an engine push right onto a tranny than having to fight it for two hours like my friend did because he doesn't believe in them. My 20B slipped right into its new home ('76 Cosmo tranny... heh, it's a Cosmo engine on a Cosmo tranny!).
06-27-2004, 06:03 PM
#163
Senior Member
Join Date: Nov 2001
Posts: 2,284
Here we go. It turns out P plate bolts are infact 8mm x 1.0 while every other 8mm diameter bolt is 1.25. Heh, I learned something.
On the left we have a regular 215mm P plate bolt. In the middle is a reamer bolt with the thick unthreaded section, also from a 215mm clutch. On the right we have a secondary injector rail hold-down bolt from my Cosmo engine.
On the left we have a regular 215mm P plate bolt. In the middle is a reamer bolt with the thick unthreaded section, also from a 215mm clutch. On the right we have a secondary injector rail hold-down bolt from my Cosmo engine.
06-27-2004, 06:05 PM
#164
Senior Member
Join Date: Nov 2001
Posts: 2,284
The difference in thread pitches is easier to see in real life, so you'll easily be able to see the differences when compared thread to thread.
Here are the heads of the bolts for comparison's sake.
It's so nice having access to a decent digital camera.
Here are the heads of the bolts for comparison's sake.
It's so nice having access to a decent digital camera.
06-27-2004, 06:11 PM
#165
Senior Member
Thread Starter
Join Date: Jul 2002
Location: Fayetteville, Georgia
Posts: 2,483
Yeah this is a Mavica so it's old and sucks. Here's one of the two bolts I have. It looks to be the same as your "regular" 215mm PP bolt. The size and thread is 8mm x 1.0 according to Advance Auto Parts, hehe.
06-27-2004, 06:14 PM
#166
Senior Member
Thread Starter
Join Date: Jul 2002
Location: Fayetteville, Georgia
Posts: 2,483
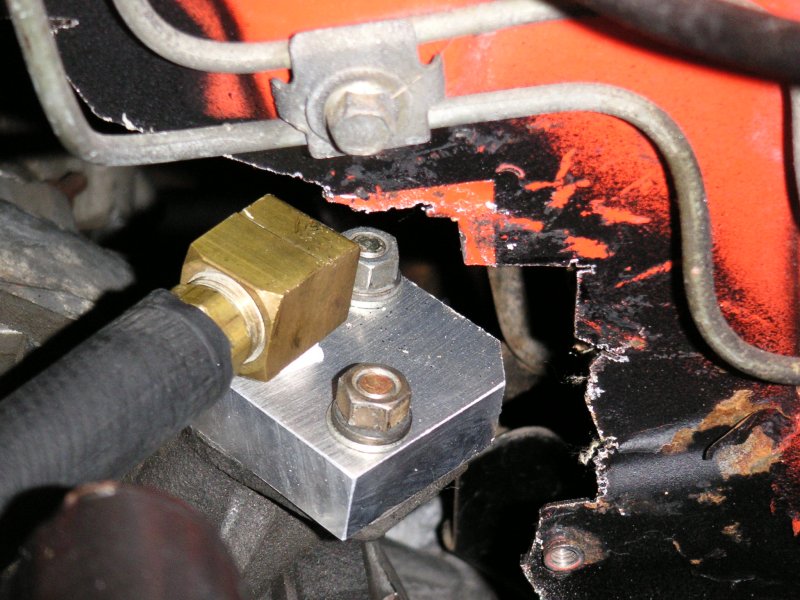
While I was in the garage I also thought about something else...what am I going to do about these fubar'd oil fittings? These were welded to a bracket that was connected to a hardline (oil) to the motor. It would appear that these fittings connected to an oil cooler.
I have the GSL-SE oil cooler...what size and/or type of fittings are these?
I have the GSL-SE oil cooler...what size and/or type of fittings are these?
06-27-2004, 06:49 PM
#167
Senior Member
Join Date: Nov 2001
Posts: 2,284
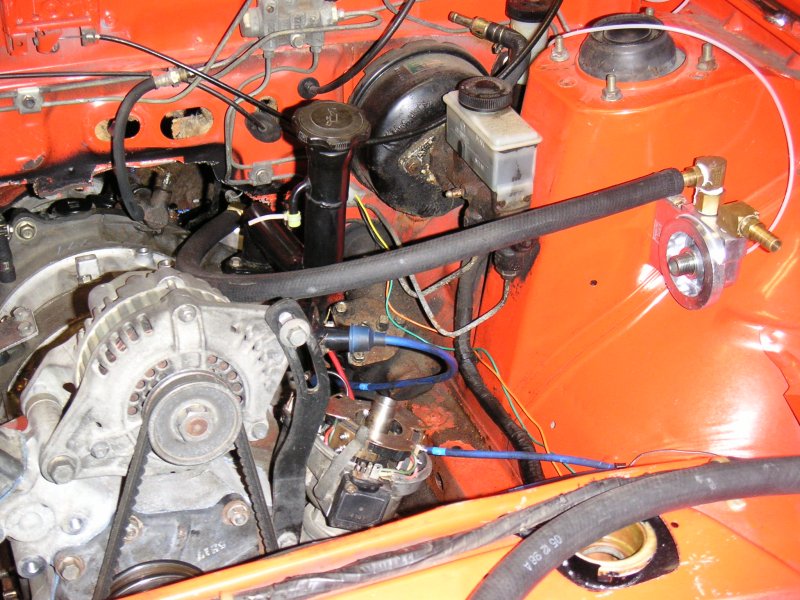
The Cosmo engine uses an oil filter pedestal with a banjo bolt fitting. It also has a hard line up to the front of the engine which then goes into a rubber hose, as does the front cover oil line. I bet you could fab something similar to what I made (only without replacing the oil filter pedestal with a Racing Beat block off kit and a remote oil filter mount).
'79-'82 oil cooler
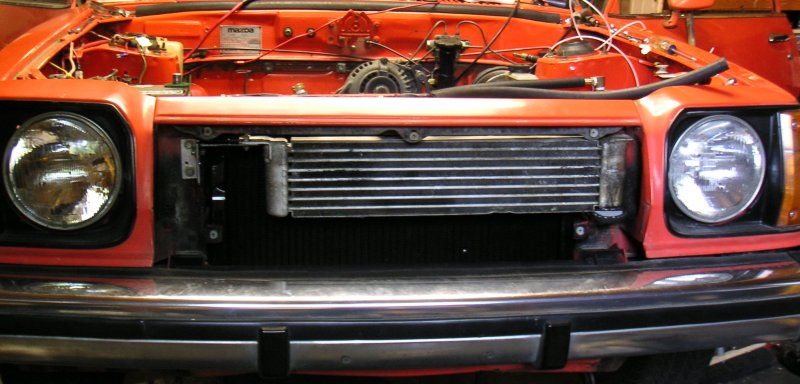
You can see the two oil cooler fittings (barbed ends) have been gutted from the stock lines are are waiting for aftermarket lines. Same with down at the front cover.
And etc.
'79-'82 oil cooler
You can see the two oil cooler fittings (barbed ends) have been gutted from the stock lines are are waiting for aftermarket lines. Same with down at the front cover.
And etc.
06-27-2004, 06:58 PM
#169
Senior Member
Join Date: Nov 2001
Posts: 2,284
Uh, I think it's 1/2 diameter. That what seems to fit on the gutted stock oil fittings after you remove the crimped shells and pull off the old hose. It's spretty easy to do, but only cut 'em and gut 'em if you're sure it's necessary (or if they're leaking through the fabric).
06-27-2004, 07:23 PM
#170
Senior Member
Thread Starter
Join Date: Jul 2002
Location: Fayetteville, Georgia
Posts: 2,483
I don't know yet if I'm going to need to replace them, I was going to see once the motor (cross my fingers) starts and the oil flows.
This is what I've got. I can't remember how this crap went together! Apparently I haven't taken enough pics.
Okay I think I have it pieced together. This line hooks to the front cover:
This is what I've got. I can't remember how this crap went together! Apparently I haven't taken enough pics.
Okay I think I have it pieced together. This line hooks to the front cover: