
teardrops on the e-shaft


Senior Member
Joined: Aug 2004
Posts: 186
From: San Diego
Originally Posted by diabolical1' post='803910' date='Feb 24 2006, 09:13 AM
by the way, that's supposed to be "FD" rear regulator ...
Hey Lynn or diabolical1,
Would it be possible if you can post some pics of this modification? To show us what it looks like. Would be much appreciated.

Member
Joined: Oct 2004
Posts: 83
Would it be possible if you can post some pics of this modification? To show us what it looks like. Would be much appreciated.[/i]
The pics of mine in the linked thread not good enough?
I already blew that engine (Atkins 2mm seals @15psi ~400RWHP). I found the reason my oil pressure was lower (90-110psi) was my front cover o-ring was pinched; I am going to dowel it this time around.
At 90-110psi oil pressure and 8,500rpm redline on S4 TII rotors there were some slight shiny spots on the outer ends of the bearings.
I am going to fix the oil pressure back up to 130psi (MFR regulator) and hold the redline down to 8,000rpm or 8,500rmp if I balance and lighten the rotors.
Oh, I found why the power was dropping at 7,500rpm. I had the MAP sensor tapped off the primary runner and it was seeing +-4psi fluctuations from dynamic effect. Put the MAP line to the plenum and it pulled smooth and hard to redline.
My porting is staying the same when it goes back together!

Thread Starter
Senior Member
Joined: Oct 2003
Posts: 500
From: I don't really exist ...
Originally Posted by BLUE TII' post='804082' date='Feb 24 2006, 06:07 PM
At 90-110psi oil pressure and 8,500rpm redline on S4 TII rotors there were some slight shiny spots on the outer ends of the bearings.
I am going to fix the oil pressure back up to 130psi (MFR regulator) and hold the redline down to 8,000rpm or 8,500rmp if I balance and lighten the rotors.
not sure if i ever thanked you for putting me on with this mod for rotaries, but if not, then thanks.
sounds like balancing issues to me if you saw contact on the outer ends at only 8500 RPM. so i think you're back on track if you're getting it balanced. sorry to hear that the motor went south, but such is the game.
i didn't know you were on this board, too - but i guess it shouldn't be a surprise.

Fabricator

Joined: Jan 2004
Posts: 1,322
From: Central Ohio (Hebron) Zephyrhills Fla.
Originally Posted by diabolical1' post='804171' date='Feb 25 2006, 12:24 AM
hey man,
not sure if i ever thanked you for putting me on with this mod for rotaries, but if not, then thanks.
sounds like balancing issues to me if you saw contact on the outer ends at only 8500 RPM. so i think you're back on track if you're getting it balanced. sorry to hear that the motor went south, but such is the game.
i didn't know you were on this board, too - but i guess it shouldn't be a surprise.
My Idea came from big displacement flat 4 cylinder VWs. They have (and aircraft engines have, a tendancy to pound out the center main bearing saddle with both center throws going the same direction, and no counter weights. (Like running a rotary without the counterweights).
My cranks are in engines right now, so I cannot provide pictures.
Damage to corner seal areas and the ends of main bearings shined up is caused by crank flex. It shows up in my engines at the front of the rear main bearing shell first as a shiny area about 1/8" wide at the front end of the bearing. (Not any more) I scrape out that much of the overly and sand off the overly on the front half of the shell with 600 silicone carbide paper in solvent.
The longer crank and heavier rotors of the 13B style engines requires that the rotor width at the apex area be reduced about .012" to .015" per side. It can be a taper, but just a straight cut works fine and takes off some more weight. Use very sharp tooling and debur everything when done. That will get the bearings looking good and the rotors not touching anything. More revs (More than you have been using) are available with lightened rotors and a rebalance. And.......at least 100 PSI of oil pressure.
Lynn E. Hanover

Senior Member
Joined: Dec 2003
Posts: 162
Originally Posted by Lynn E. Hanover' post='803852' date='Feb 24 2006, 05:35 AM
In this picture I have placed a steel tube through the front oiling port to show it's location. The stock plug is drilled out. A hole for a dash 10 boss fitting is tapped. A boss fitting uses a copper "O" ring to seal.
A tapered pipe thread will work, but if over tightened, will crack open the port and ruin the iron.
Lynn E. Hanover
That's helped clearup a confusion with me. I couldn't work out where you tapped the front looking at the other installations.
Thanks
Bill
Fabricator
Joined: Jan 2004
Posts: 1,322
From: Central Ohio (Hebron) Zephyrhills Fla.
Originally Posted by bill shurvinton' post='804614' date='Feb 27 2006, 12:36 AM
That's helped clearup a confusion with me. I couldn't work out where you tapped the front looking at the other installations.
Thanks
Bill
Unless you have the equipment to do it, I would take the front iron to a machine shop to get that drill and tap operation completed. While the iron is still clamped in place they can flycut the outer (sealing surface) dead flat at 90 degrees to the centerline of the hole. A copper or aluminum "O" ring will be doing the sealing.
Warn them about the frigile bridgebort area lest they crack the bridge while clamping.
Lynn E. Hanover

Thread Starter
Senior Member
Joined: Oct 2003
Posts: 500
From: I don't really exist ...
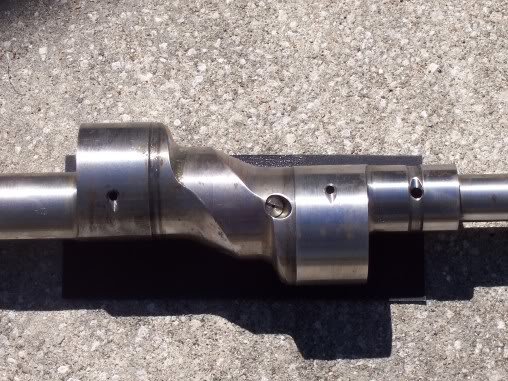
by the way, as you can see this shaft is pretty ratty. i went at with a fine emory cloth a few minutes after i took the pics, not much, but just to see if it will get the rust spots off - rather discouraging as some spots don't look like they are coming out. i'll have an earnest go at it after i clean the oil passages, maybe later, maybe tomorrow. still a little weak ...
at any rate, i plan to have ISC Racing polish it for me - probably a dumb question - but do you think that all the spots will come off when they're done?
at any rate, i plan to have ISC Racing polish it for me - probably a dumb question - but do you think that all the spots will come off when they're done?