
Oil System Mods


Fabricator

Joined: Jan 2004
Posts: 1,322
From: Central Ohio (Hebron) Zephyrhills Fla.
Originally Posted by 13BT_Starlet' post='890814' date='Dec 26 2007, 10:13 AM
Thanks alot Lynn for your time and your hard work you put in to this matter , I really appreciated and will keep you posted as the project comes along.
Thanks Gilbert
Thanks Gilbert
I have generated three pictograms to show the flow paths of the three systems.
Lynn E. Hanover
Fabricator
Joined: Jan 2004
Posts: 1,322
From: Central Ohio (Hebron) Zephyrhills Fla.
Originally Posted by Lynn E. Hanover' post='891237' date='Jan 1 2008, 09:17 AM
I have generated three pictograms to show the flow paths of the three systems.
Lynn E. Hanover
Lynn E. Hanover
Sorry, I forgot to convert that to a JPG.
Here it is.

Thread Starter
Member
Joined: Dec 2007
Posts: 78
From: EastCoast , Florida
Originally Posted by Lynn E. Hanover' post='891238' date='Jan 1 2008, 11:24 AM
Sorry, I forgot to convert that to a JPG.
Here it is.
Here it is.
Hello Lynn , Hope you had a wonderful chirstmas along with your family and happy new years to you and yours and may the new years bring lots of prosperous ,blessings and more than all health . Happy New Years All ! and thaks again for coming thru with your knowledge .

Junior Member
Joined: Apr 2007
Posts: 4
Let's bring this back from the dead....
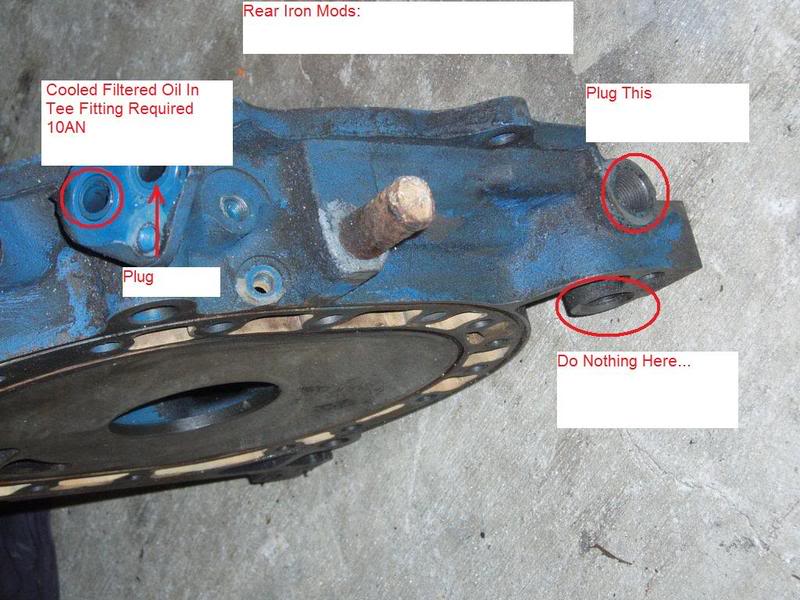
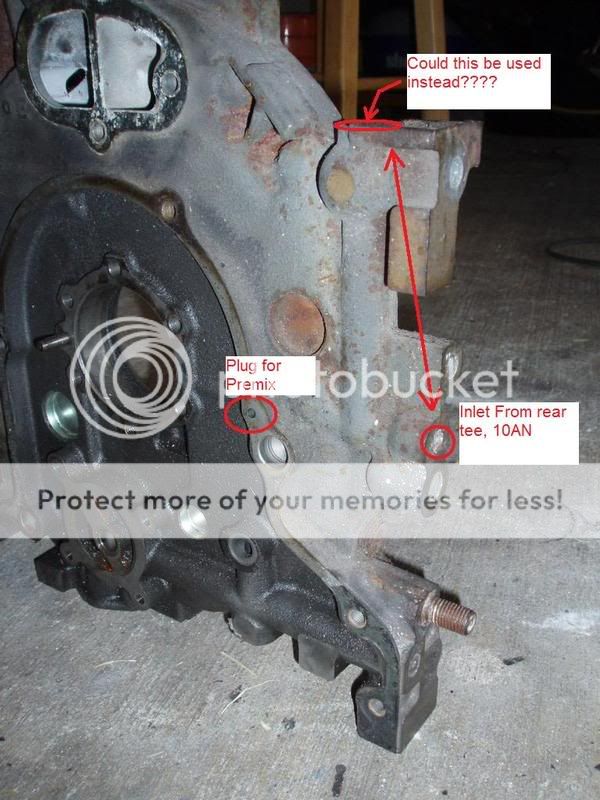
Please review my 2 pics from some dead irons. I want to make sure I have the dry sump system laid out correctly. I have 2 pics loaded. The rear iron I am comfy with. Think I got that covered. The front iron though....
Do I plug the OMP feed line in the pic? Also, When going from the rear tee to the front inlet, can I just machine the inlet into the top as shown? Is there a reason not? It would fit my application better if I can.
Is there anything I am missing other than the pickup mods? Thanks in advance!
James
Fabricator
Joined: Jan 2004
Posts: 1,322
From: Central Ohio (Hebron) Zephyrhills Fla.
Originally Posted by Geauxkart' post='904514' date='Jul 12 2008, 09:50 AM
Let's bring this back from the dead....
Please review my 2 pics from some dead irons. I want to make sure I have the dry sump system laid out correctly. I have 2 pics loaded. The rear iron I am comfy with. Think I got that covered. The front iron though....
Do I plug the OMP feed line in the pic? Also, When going from the rear tee to the front inlet, can I just machine the inlet into the top as shown? Is there a reason not? It would fit my application better if I can.
Is there anything I am missing other than the pickup mods? Thanks in advance!
James
On the rear iron, the outer gallery needs no plug, as nothing will be in that gallery. Just plug the banjo fitting hole to keep out dirt.
On the front iron, the upper end of the vertical galley is seldom used, because, the bulbus shape in the iron is the end of the dowel gallery and this area is quite thin. On later irons this may have been improved, but, as the front dowel hole seldom fails it may not be the case. So the is little material to machine flat and counter bore for a dash 10 by "O" ring Bose fitting. A pipe fitting will crack it out instantly when tightened, if it doesn't fail while you are threading it.
As painful as it may be space wise, the latteral gallery has a good size land area around it and takes boring and threading well. Again, if you don't have a mill, have a machine shop install the dash 10 Boss fitting for you. The boss fitting uses an "O" ring for sealing, and has straight threads so little stress is introduced into the casting.
Is this going to be a dry sump system with a flat plate rather than an oil pan?
Lynn E. Hanover
Junior Member
Joined: Apr 2007
Posts: 4
Originally Posted by Lynn E. Hanover' post='904520' date='Jul 12 2008, 02:26 PM
Is this going to be a dry sump system with a flat plate rather than an oil pan?
Lynn E. Hanover
Lynn E. Hanover
Yup. The plate is made, I have a weaver dry sump pump.
Thanks for the input. I have a few bad irons for practice. Fortunately, I do have access to a mill.
It's going in a Lotus 7 / Locost, and I really wanted the motor "on the ground". Not exactly a locost decision, but it happens....
James
Fabricator
Joined: Jan 2004
Posts: 1,322
From: Central Ohio (Hebron) Zephyrhills Fla.
Originally Posted by Geauxkart' post='904537' date='Jul 12 2008, 01:27 PM
Yup. The plate is made, I have a weaver dry sump pump.
Thanks for the input. I have a few bad irons for practice. Fortunately, I do have access to a mill.
It's going in a Lotus 7 / Locost, and I really wanted the motor "on the ground". Not exactly a locost decision, but it happens....
James
Thanks for the input. I have a few bad irons for practice. Fortunately, I do have access to a mill.
It's going in a Lotus 7 / Locost, and I really wanted the motor "on the ground". Not exactly a locost decision, but it happens....
James
I forgot about the OMP plug. I found some bearing ***** that were a snug fit in that passage. I pounded it into the aluminum
and it works fine.
The first car I built was a Lotus Super 7. Ended up doing the firewall forward over again as the stock structure was very light and broke up under racing stress. Spitfire spindles suck real bad also. As did the stock rear axels.
Ran formula Ford front tires on the front and Formula Continental fronts on the rear. All from the GoodYear tire pile, for free.
If you use the trailing "A" locater don't use lower links. Just the top links. Engine was a Ford 1340CC pushrod turd. For-runner of the first year Pinto engine.
Lynn E. Hanover
Fabricator
Joined: Jan 2004
Posts: 1,322
From: Central Ohio (Hebron) Zephyrhills Fla.
Originally Posted by Lynn E. Hanover' post='904558' date='Jul 12 2008, 03:24 PM
I forgot about the OMP plug. I found some bearing ***** that were a snug fit in that passage. I pounded it into the aluminum
and it works fine.
The first car I built was a Lotus Super 7. Ended up doing the firewall forward over again as the stock structure was very light and broke up under racing stress. Spitfire spindles suck real bad also. As did the stock rear axels.
Ran formula Ford front tires on the front and Formula Continental fronts on the rear. All from the GoodYear tire pile, for free.
If you use the trailing "A" locater don't use lower links. Just the top links. Engine was a Ford 1340CC pushrod turd. For-runner of the first year Pinto engine.
Lynn E. Hanover
If you have not done your scavenge pickups yet, here is a way to do that on the cheap that works great, to the extent that I used them until the first store bought (Daryl Drummond) race engine came to us.
For the rear pickup: Since the stock oil pressure regulator is not used in a dry sump, I drilled through the side of a gutted old style regulator. I radiused the hole real nice. Screwed the regulator back into the iron with the hole down . Weld a AN steel dash 10 onto the banjo fitting (saw off the metric crap) screw the banjo bolt and washers into the stock position, and there is your new rear scavenge pickup.
For the front pickup, I used the stock oil pressure out fitting. Saw off the outer half and weld on a dash 10 steel AN. Inside cut the threaded boss where the front relief was located off at a slight angle. So most of the hole will be about 1/4 to 1/3 of an inch above the plate. The "O" ring land where the "O" ring blows out all of the time, needs to be plugged with a piece of sheet metal or two. Either one piece with the "O" ring installed on top of it or, a number of pieces that will stick out a bit above the edge of the recess. Or, you can tap the aluminum and plug the hole with a hex socket pipe plug. There you go, both scavenge pickups from stock parts. If that was not clear, I can do pictures.
Lynn E. Hanover
Junior Member
Joined: Apr 2007
Posts: 4
Originally Posted by Lynn E. Hanover' post='904578' date='Jul 12 2008, 07:52 PM
If you have not done your scavenge pickups yet, here is a way to do that on the cheap that works great, to the extent that I used them until the first store bought (Daryl Drummond) race engine came to us.
For the rear pickup: Since the stock oil pressure regulator is not used in a dry sump, I drilled through the side of a gutted old style regulator. I radiused the hole real nice. Screwed the regulator back into the iron with the hole down . Weld a AN steel dash 10 onto the banjo fitting (saw off the metric crap) screw the banjo bolt and washers into the stock position, and there is your new rear scavenge pickup.
For the front pickup, I used the stock oil pressure out fitting. Saw off the outer half and weld on a dash 10 steel AN. Inside cut the threaded boss where the front relief was located off at a slight angle. So most of the hole will be about 1/4 to 1/3 of an inch above the plate. The "O" ring land where the "O" ring blows out all of the time, needs to be plugged with a piece of sheet metal or two. Either one piece with the "O" ring installed on top of it or, a number of pieces that will stick out a bit above the edge of the recess. Or, you can tap the aluminum and plug the hole with a hex socket pipe plug. There you go, both scavenge pickups from stock parts. If that was not clear, I can do pictures.
Lynn E. Hanover
Perefectly clear on the pickups. It is what I had planned on doing for the pickup after staring at the plates for about 2 hours and figuring it all out. Should look pretty organized using the factory fittings. My fiance doesn't believe that I am working when I just stare at parts for hours on end. What does she know, huh?
The Locost is an IRS design, The front end has more bracing than standard, tubing is pretty light, why not I figured. I am running Form. Atlantic tires, take offs w/ 80-90% go for about $25 each from Lee (Usddrt on ebay - great guy), 15x10 w/ r25 cmpound.
I am so excited for the day I get to drive this thing. Still a solid 4-6 months, but it's coming!!
Thanks again for the input lynn, greatly appreciated!
James S

Junior Member
Joined: Jul 2004
Posts: 2
Originally Posted by Lynn E. Hanover' post='904578' date='Jul 12 2008, 08:52 PM
If you have not done your scavenge pickups yet, here is a way to do that on the cheap that works great, to the extent that I used them until the first store bought (Daryl Drummond) race engine came to us.
For the rear pickup: Since the stock oil pressure regulator is not used in a dry sump, I drilled through the side of a gutted old style regulator. I radiused the hole real nice. Screwed the regulator back into the iron with the hole down . Weld a AN steel dash 10 onto the banjo fitting (saw off the metric crap) screw the banjo bolt and washers into the stock position, and there is your new rear scavenge pickup.
For the front pickup, I used the stock oil pressure out fitting. Saw off the outer half and weld on a dash 10 steel AN. Inside cut the threaded boss where the front relief was located off at a slight angle. So most of the hole will be about 1/4 to 1/3 of an inch above the plate. The "O" ring land where the "O" ring blows out all of the time, needs to be plugged with a piece of sheet metal or two. Either one piece with the "O" ring installed on top of it or, a number of pieces that will stick out a bit above the edge of the recess. Or, you can tap the aluminum and plug the hole with a hex socket pipe plug. There you go, both scavenge pickups from stock parts. If that was not clear, I can do pictures.
Lynn E. Hanover
For the rear pickup: Since the stock oil pressure regulator is not used in a dry sump, I drilled through the side of a gutted old style regulator. I radiused the hole real nice. Screwed the regulator back into the iron with the hole down . Weld a AN steel dash 10 onto the banjo fitting (saw off the metric crap) screw the banjo bolt and washers into the stock position, and there is your new rear scavenge pickup.
For the front pickup, I used the stock oil pressure out fitting. Saw off the outer half and weld on a dash 10 steel AN. Inside cut the threaded boss where the front relief was located off at a slight angle. So most of the hole will be about 1/4 to 1/3 of an inch above the plate. The "O" ring land where the "O" ring blows out all of the time, needs to be plugged with a piece of sheet metal or two. Either one piece with the "O" ring installed on top of it or, a number of pieces that will stick out a bit above the edge of the recess. Or, you can tap the aluminum and plug the hole with a hex socket pipe plug. There you go, both scavenge pickups from stock parts. If that was not clear, I can do pictures.
Lynn E. Hanover
Wow, sounds neat, I would GREATLY appreciate as many pictures as you could, as I am doing a similar thing.