
My #1 Rotary Engine Fix


Thread Starter
Member
Joined: Jun 2004
Posts: 52
From: Slidell, LA
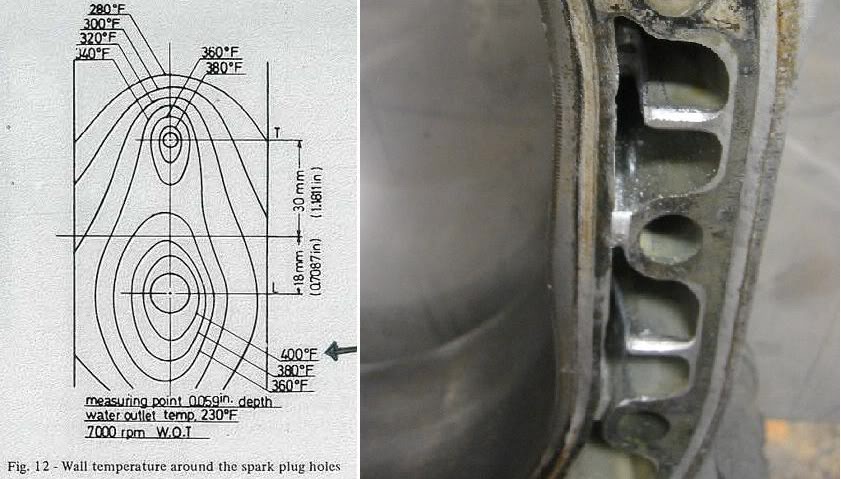
The Rotary�s biggest flaw is the hump at the spark plug opening in the housings.
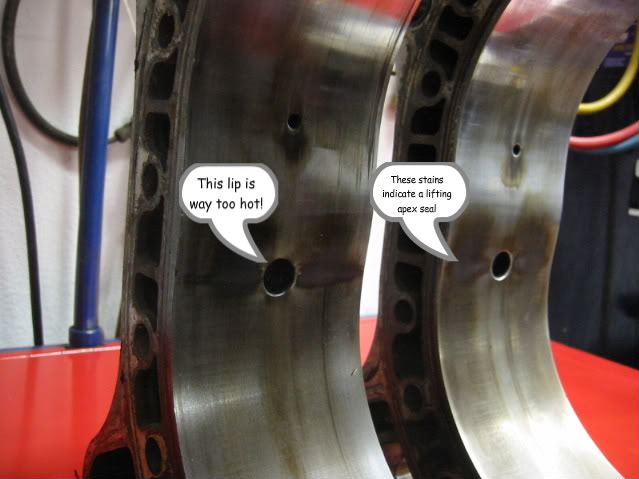
This problem area can be minimized by using cold plugs and a good water pump. But this is the Root Cause of Apex Seal problems. Hard seals chip; softer seals warp, bow, or bend.
The actual problem was aggravated by a Mazda improvement.
Mazda found the combustion burn-rate could be improved by widening the distance between the leading and trailing plugs. In order to do this as economically as possible they kept the through-bolt locations in the same place so they could use the existing side plates. This in turn decreases the size of probably the most important water passage in the engine!
This Generational housing change is shown it the following image.
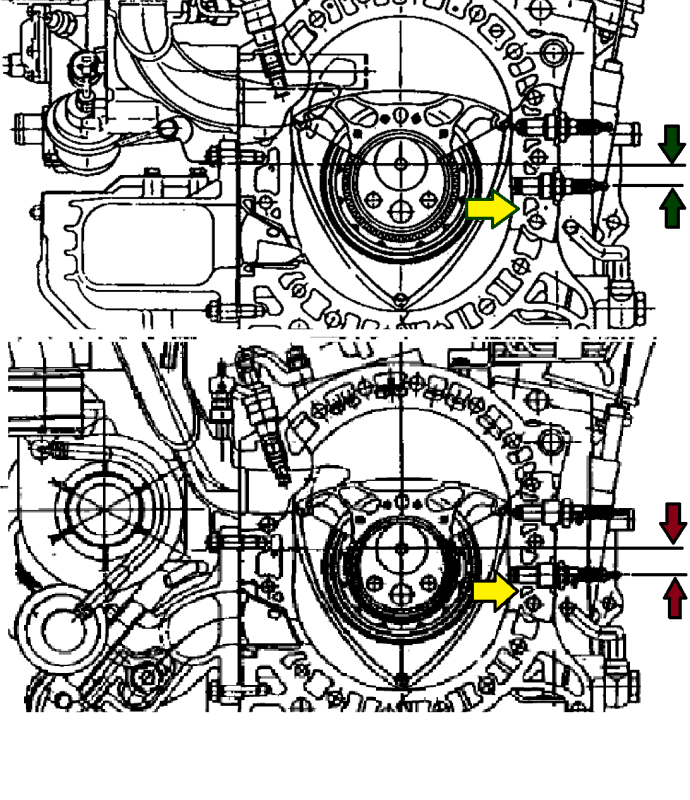
Notice that the water passages in the top housing drawing gradually get larger which corresponds to the heat map of the housing.
The lower drawing is of the latest version with smaller water passages on the more critical higher temp section.
This is what the actual flow looks like on a 3rd housing.
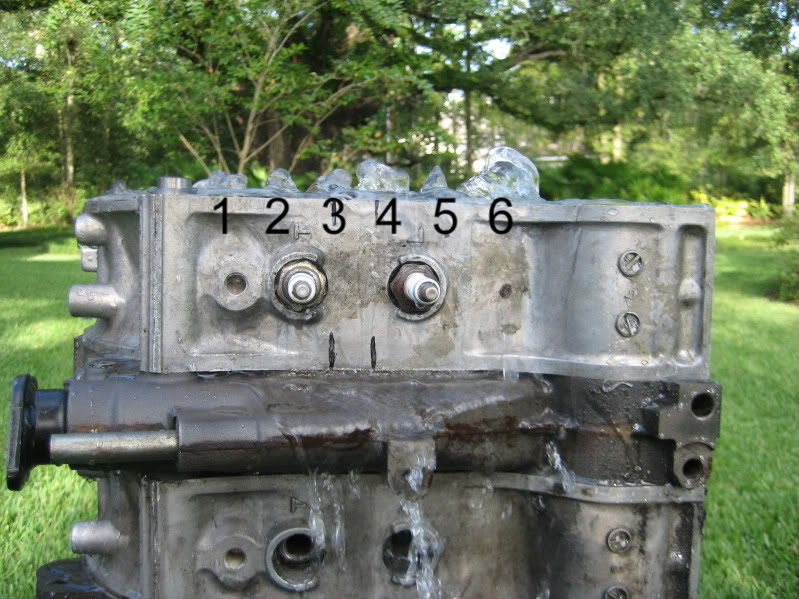
We need to increase flow at passages #3 and #5.
This next shot shows the solution. The housing is ported to increase the flow at this critical area.
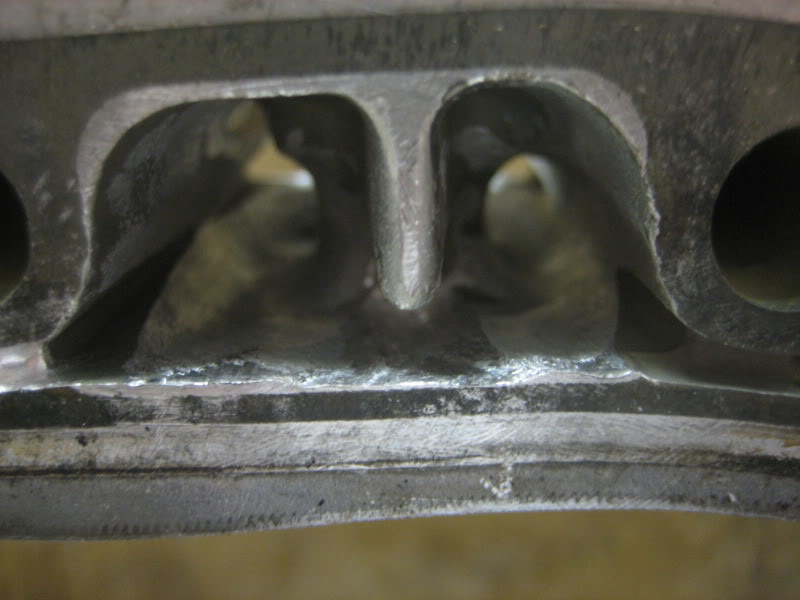
This is a critical area so as always a compromise must be had� cutting enough to increase flow while not weakening the housing surface which supports over a 1000 psi (although over a very short period of time).
Do not cut the area next the plug boss anymore than removing the casting slag. Concentrate on cutting the thru-bolt side and the floor next to the housing face. I join the 3rd gen�s end mill cuts from one side to the other. They are about 5mm deep. Try not to cut through boss for the thru-bolt but if you do it is not a big problem. I use a 6" long 1/4" burr.
I have presented most of this information before in different threads but I thought it would be best to consolidate it as Problem/Solution , especially for new guys and home engine builders.
Barry
This problem area can be minimized by using cold plugs and a good water pump. But this is the Root Cause of Apex Seal problems. Hard seals chip; softer seals warp, bow, or bend.
The actual problem was aggravated by a Mazda improvement.
Mazda found the combustion burn-rate could be improved by widening the distance between the leading and trailing plugs. In order to do this as economically as possible they kept the through-bolt locations in the same place so they could use the existing side plates. This in turn decreases the size of probably the most important water passage in the engine!
This Generational housing change is shown it the following image.
Notice that the water passages in the top housing drawing gradually get larger which corresponds to the heat map of the housing.
The lower drawing is of the latest version with smaller water passages on the more critical higher temp section.
This is what the actual flow looks like on a 3rd housing.
We need to increase flow at passages #3 and #5.
This next shot shows the solution. The housing is ported to increase the flow at this critical area.
This is a critical area so as always a compromise must be had� cutting enough to increase flow while not weakening the housing surface which supports over a 1000 psi (although over a very short period of time).
Do not cut the area next the plug boss anymore than removing the casting slag. Concentrate on cutting the thru-bolt side and the floor next to the housing face. I join the 3rd gen�s end mill cuts from one side to the other. They are about 5mm deep. Try not to cut through boss for the thru-bolt but if you do it is not a big problem. I use a 6" long 1/4" burr.
I have presented most of this information before in different threads but I thought it would be best to consolidate it as Problem/Solution , especially for new guys and home engine builders.
Barry
Thread Starter
Member
Joined: Jun 2004
Posts: 52
From: Slidell, LA
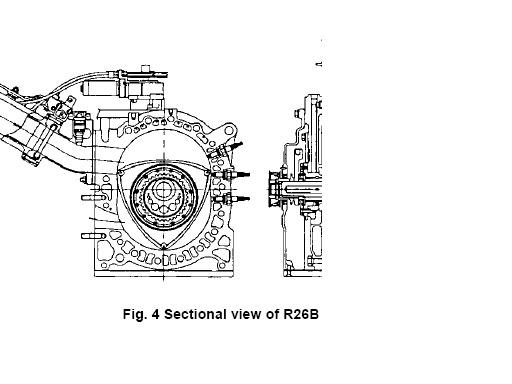
How about the Factory Racing Engines. Here is a picture of the R26B racing housing. The Money is No Object� project. What do their housings look like? It looks similar to the one being proposed.


Thread
Thread Starter
Forum
Replies
Last Post
firewrx
3rd Generation Specific
9
Jun 21, 2002 10:25 PM
Currently Active Users Viewing This Thread: 1 (0 members and 1 guests)