
6-PORT SLEEVE INSERTS


Thread Starter
Junior Member
Joined: Nov 2008
Posts: 11
From: F'n W.Palmdale, CA
Items needed:
Port sleeves, Pineapples inserts, Loctite "RED", an awl(or something to scratch with),
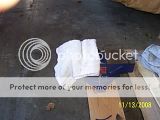
a piece of wet/dry 400 grit paper, a 1/8" punch, a hammer, a couple of clean rags, carburetor cleaner,
a cleaning brush, a vise.
First you will clean the inserts and sleeves; for the sleeves you want to use the cleaning brush
to make sure that all deposits ate scrubbed clean. Use the carburetor cleaner as your solvent,
it works VERY well.
Set the vise up with about 3/4" - 1" gap in the jaws, you need somewhere for the pin to go.
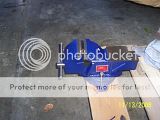
Next, you'll use one of the rags to protect the sleeve from the edges of the vise jaws.
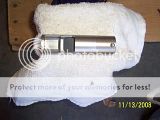
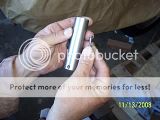
This is the insert by itself; it is machined to .001" tolerance

This is the sleeve and the insert, ready for modification

Here you see the sleeve supported by the vise, cushioned by the rag, with a gap for the pin to fall into.

You wont have to hit the pin hard at all, just a couple of gentle taps should do it.
NOTE: you will drive the pin out with the port opening side of the sleeve up. Also note the orientation of the pin.
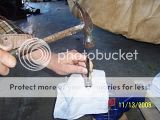
The pin comming out through the bottom of sleeve.

Score/scratch up the areas that will have most contact with the insert, lightly sand
to debur, spray with carb. cleaner, making sure that all surfaces are clean.

Remember, the inserts are made to exacting specs.(+/- .001"), so if they dont slide in chances are theres a
bur or debris that you missed. It doesn't hurt to lightly sand the inside surfaces to loosen any residue that
you may have missed the first time.
Port sleeves, Pineapples inserts, Loctite "RED", an awl(or something to scratch with),
a piece of wet/dry 400 grit paper, a 1/8" punch, a hammer, a couple of clean rags, carburetor cleaner,
a cleaning brush, a vise.
First you will clean the inserts and sleeves; for the sleeves you want to use the cleaning brush
to make sure that all deposits ate scrubbed clean. Use the carburetor cleaner as your solvent,
it works VERY well.
Set the vise up with about 3/4" - 1" gap in the jaws, you need somewhere for the pin to go.

Next, you'll use one of the rags to protect the sleeve from the edges of the vise jaws.

This is the insert by itself; it is machined to .001" tolerance

This is the sleeve and the insert, ready for modification

Here you see the sleeve supported by the vise, cushioned by the rag, with a gap for the pin to fall into.

You wont have to hit the pin hard at all, just a couple of gentle taps should do it.
NOTE: you will drive the pin out with the port opening side of the sleeve up. Also note the orientation of the pin.

The pin comming out through the bottom of sleeve.

Score/scratch up the areas that will have most contact with the insert, lightly sand
to debur, spray with carb. cleaner, making sure that all surfaces are clean.

Remember, the inserts are made to exacting specs.(+/- .001"), so if they dont slide in chances are theres a
bur or debris that you missed. It doesn't hurt to lightly sand the inside surfaces to loosen any residue that
you may have missed the first time.

Thread Starter
Junior Member
Joined: Nov 2008
Posts: 11
From: F'n W.Palmdale, CA
This is where, and how much Loctite I applied to the inside of my sleeves where the inserts will come to rest.

The inserts pushed all the way down into the end of the sleeve.

The inserts fit quite nicely in the sleeves.

When replacing the pin, remember the orientation that I told you to remember; this is where
it comes in handy. The SMALL end of the pin goes in first, then the fat lip is pushed back into the sleeve, then punched down to just below the surface.
Using the same punch that you used to tap out the pin now tap it in. Both ends of the pin will
be BELOW the surface of the sleeve

The pin has been properly seated when you feel a small indention over the pin on both sides of the pin.

Using the punch, a cold chisel, or large screw driver, peen the edges of the sleeve opening in,
to secure the insert mechanically.

This is a close up so you can actually see the SLIGHTLY peened in edges, securely locating the insert.

Taaa Daaaa! you're done.
Approximate time to complete BOTH sleeves: 20 mins...
You can see a pro do it in a video here

The inserts pushed all the way down into the end of the sleeve.

The inserts fit quite nicely in the sleeves.

When replacing the pin, remember the orientation that I told you to remember; this is where
it comes in handy. The SMALL end of the pin goes in first, then the fat lip is pushed back into the sleeve, then punched down to just below the surface.

Using the same punch that you used to tap out the pin now tap it in. Both ends of the pin will
be BELOW the surface of the sleeve

The pin has been properly seated when you feel a small indention over the pin on both sides of the pin.

Using the punch, a cold chisel, or large screw driver, peen the edges of the sleeve opening in,
to secure the insert mechanically.

This is a close up so you can actually see the SLIGHTLY peened in edges, securely locating the insert.

Taaa Daaaa! you're done.
Approximate time to complete BOTH sleeves: 20 mins...
You can see a pro do it in a video here


Super Moderator

Joined: Sep 2002
Posts: 5,425
From: Tallahassee, FL
Great job! The hard part is getting the sleeves out and back in. Well, not hard, but tedious (especially if you find broken vac hoses, leaking fuel pd, broken oil injector hoses, etc. under the intake manifold).
Thread Starter
Junior Member
Joined: Nov 2008
Posts: 11
From: F'n W.Palmdale, CA
Originally Posted by Baldy' post='912228' date='Nov 21 2008, 08:23 PM
Great job! The hard part is getting the sleeves out and back in. Well, not hard, but tedious (especially if you find broken vac hoses, leaking fuel pd, broken oil injector hoses, etc. under the intake manifold).
...my advantage is I am putting in a fresh motor at the same time. Inserts are ready and waiting for the installation date...

Thread
Thread Starter
Forum
Replies
Last Post
TweakGames
Rotary Engine Building, Porting & Swaps
25
Oct 14, 2007 12:10 AM
Currently Active Users Viewing This Thread: 1 (0 members and 1 guests)